


In this example we are going to see how to use the Android Intent component. You can think of Intents as messages that the Android Platform sends when it wants to request the service of another resource, like launching another Activity or another Service. You can send an Intent to the Android System using certain calls, like startActivity or startService. You can signal the Android System that a certain event has occurred using Intent filters.
In this simple example we are going to start a new Service that reads the HTML code of a Web Pages and sends it back to the main Activity. Additionally, we will call an Implicit intent in order to call a built in Activity, the Web Browser that loads up a Web page.
For this tutorial, we will use the following tools in a Windows 64-bit platform:
- JDK 1.7
- Eclipse 4.2 Juno
- Android SKD 4.2
1. Create a new Android Project
Open Eclipse IDE and go to File -> New -> Project -> Android -> Android Application Project.
You have to specify the Application Name, the Project Name and the Package name in the appropriate text fields and then click Next.

In the next window make sure the “Create activity” option is selected in order to create a new activity for your project, and click Next. This is optional as you can create a new activity after creating the project, but you can do it all in one step.

Select “BlankActivity” and click Next.

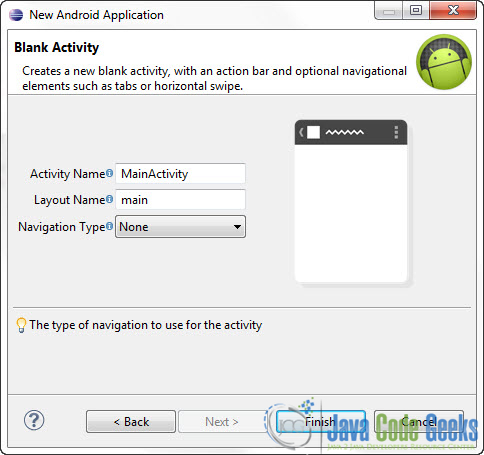
You will be asked to specify some information about the new activity. In the Layout Name text field you have to specify the name of the file that will contain the layout description of your app. In our case the file res/layout/main.xml will be created. Then, click Finish.
3. Creating the layout of the Main Activity
Open res/layout/main.xml file :

And paste the following code :
main.xml:
<?xml version="1.0" encoding="utf-8"?>
<LinearLayout xmlns:android="http://schemas.android.com/apk/res/android"
    android:layout_width="match_parent"
    android:layout_height="match_parent"
    android:orientation="vertical" >

     <Button
        android:id="@+id/btn2"
        android:layout_width="match_parent"
        android:layout_height="wrap_content"
        android:onClick="launchbrowser"
        android:text="Launch Browser" >
    </Button>

    <Button
        android:id="@+id/btn"
        android:layout_width="match_parent"
        android:layout_height="wrap_content"
        android:onClick="readWebpage"
        android:text="Load Webpage" >
    </Button>

    <WebView
        android:id="@+id/webView"
        android:layout_width="fill_parent"
        android:layout_height="fill_parent" />

</LinearLayout>
4. Create a new Service
In order to create a new Service go to the Package Explorer in the main Package an Right Click -> New -> Other -> Android Object:

Click Next and Select “Service” from the list:

Then specify the name of the Service and click Finish. The service will be automatically registered in the AndroidManifest.xml file.

LoadWebPageService.java:
package com.javacodegeeks.android.androidintentexample;

import java.io.BufferedReader;
import java.io.InputStream;
import java.io.InputStreamReader;

import org.apache.http.HttpResponse;
import org.apache.http.client.methods.HttpGet;
import org.apache.http.impl.client.DefaultHttpClient;

import android.app.Service;
import android.content.Intent;
import android.os.Bundle;
import android.os.IBinder;
import android.os.Message;
import android.os.Messenger;
import android.util.Log;

public class LoadWebPageService extends Service {

	private int MSG_ID = 2;

	public LoadWebPageService() {
	}

	@Override
	public IBinder onBind(Intent intent) {
		throw new UnsupportedOperationException("Not yet implemented");
	}

	@Override
	public void onCreate() {

	}

	@Override
	public void onStart(Intent intent, int startId) {

		String response = "";

		Bundle extras = intent.getExtras();

		if (extras != null) {
			Messenger messenger = (Messenger) extras.get("MESSENGER");
			String url = extras.getString("URL");
			CommunicationThread comm = new CommunicationThread(messenger, url);
			new Thread(comm).start();
		}

	}

	@Override
	public void onDestroy() {

	}

	class CommunicationThread implements Runnable {

		private Messenger messenger;
		String url;

		public CommunicationThread(Messenger messenger, String url) {

			this.messenger = messenger;
			this.url = url;
		}

		public void run() {

			String response = "";

			DefaultHttpClient client = new DefaultHttpClient();
			HttpGet httpGet = new HttpGet(url);

			try {
				HttpResponse execute = client.execute(httpGet);
				InputStream content = execute.getEntity().getContent();

				BufferedReader buffer = new BufferedReader(new InputStreamReader(content));
				String s = "";

				while ((s = buffer.readLine()) != null) {
					response += s;
				}

			} catch (Exception e) {
				e.printStackTrace();
			}

			Message msg = Message.obtain();
			msg.arg1 = MSG_ID;
			msg.obj = response + "Hello";
			try {
				messenger.send(msg);
			} catch (android.os.RemoteException re) {
				Log.w(getClass().getName(), "Exception sending message", re);
			}

		}

	}
}
5. Code the Main Activity
Use the Package Explorer to navigate to the Java file of the Activity you’ve created:

The basic idea is to launch a new Service using an Intent. Additionally, we want to pass a Messenger and a URL to the new Service. The messenger object will be used from the service (as you saw above) in order to send the received HTML back to the main Activity (this is only one of many ways that an Activity can communicate with a Service). Then when we receive the HTML we update the UI using a Handler. The Handler takes a Runnable object and it schedules its execution; it places the runnable process as a job in an execution queue to be run after a specified amount of time. The runnable will be run on the thread to which this handler is attached. In our case the handler is registered in the main thread.
Go to the java file that contains the code of the activity you’ve just created and paste the following code:
MainActivity.java:
package com.javacodegeeks.android.androidintentexample;

import android.app.Activity;
import android.content.ActivityNotFoundException;
import android.content.Context;
import android.content.Intent;
import android.net.Uri;
import android.os.Bundle;
import android.os.Handler;
import android.os.Message;
import android.os.Messenger;
import android.view.View;
import android.webkit.WebView;

public class MainActivity extends Activity {

	private static int MSG_ID = 2;
	private Handler handler;
	final Context context = this;
	private WebView webView;
	private String content;

	@Override
	public void onCreate(Bundle savedInstanceState) {

		super.onCreate(savedInstanceState);
		setContentView(R.layout.main);

		webView = (WebView) findViewById(R.id.webView);
		webView.getSettings().setJavaScriptEnabled(true);

		handler = new Handler() {

			@Override
			public void handleMessage(Message message) {

				if (message.arg1 == MSG_ID) {

					content = (String) message.obj;

					this.post(new Runnable() {

						public void run() {

							webView.loadData(content, "text/html; charset=UTF-8", null);

						}

					});

				}
			}
		};

	}

	public void readWebpage(View view) {

		Intent intent = new Intent(this, LoadWebPageService.class);

		Messenger messenger = new Messenger(handler);
		intent.putExtra("MESSENGER", messenger);
		intent.putExtra("URL", "http://examples.javacodegeeks.com");
		startService(intent);

	}

public void launchbrowser(View view) {

	Intent intentImplicit = new Intent(Intent.ACTION_VIEW, Uri.parse("http://examples.javacodegeeks.com"));
    try {
          startActivity(intentImplicit);
        } catch (ActivityNotFoundException ex) {
            ex.printStackTrace();
        }

	}
}
The Handler component is a very interesting feature. Take a look at the Android Handler Documentation and this Android Handler example as well.
6. Set INTERNET permissions in AndroidManifest.xml
Go to the Package Explorer and Open AndroidManifest.xml:

You have to set up the approprate permissions in order to connect to Web Pages:
    <uses-permission android:name="android.permission.INTERNET" >
    </uses-permission>
    <uses-permission android:name="android.permission.ACCESS_NETWORK_STATE" >
    </uses-permission>
So here is the manifest file.
AndroidManifest.xml:
<?xml version="1.0" encoding="utf-8"?>
<manifest xmlns:android="http://schemas.android.com/apk/res/android"
    package="com.javacodegeeks.android.androidintentexample"
    android:versionCode="1"
    android:versionName="1.0" >

    <uses-sdk
        android:minSdkVersion="8"
        android:targetSdkVersion="17" />

    <uses-permission android:name="android.permission.INTERNET" >
    </uses-permission>
    <uses-permission android:name="android.permission.ACCESS_NETWORK_STATE" >
    </uses-permission>

    <application
        android:allowBackup="true"
        android:icon="@drawable/ic_launcher"
        android:label="@string/app_name"
        android:theme="@style/AppTheme" >
        <activity
            android:name="com.javacodegeeks.android.androidintentexample.MainActivity"
            android:label="@string/app_name" >
            <intent-filter>
                <action android:name="android.intent.action.MAIN" />

                <category android:name="android.intent.category.LAUNCHER" />
            </intent-filter>
        </activity>

        <service
            android:name="com.javacodegeeks.android.androidintentexample.LoadWebPageService"
            android:enabled="true"
            android:exported="true" >
        </service>
    </application>

</manifest>
7. Run the application
This is the main screen of our Application:

Now, when you press the “Load Webpage” button :

And when you press the “Launch Browser” button:

Download Eclipse Project
This was an Android Intent Example. Download the Eclipse Project of this tutorial: AndroidIntentExample.zip
